Unity Project - Grey Boxing:
Before working on any scripts, a grey box was designed aiming towards the project that was initially planned. Furthermore, to test the Ai's basic movement functionality, creating a maze like scene could test this more efficiently. This would allow testing for things such as;
- When the Ai could see the player,
- When the Ai would lose interest in the player,
- And a basic way for the player to avoid detection.
Unity Project - Basic player movement:
Having prior Unity experience, creating a simple movement for the player was easily achievable. All that was needed, was create a script that could call the player controller so it was assigned, set a value for how fast the player could move whilst roaming and just assign basic binds that Unity provides to allow recognition of a button being pressed to move horizontally and vertically.
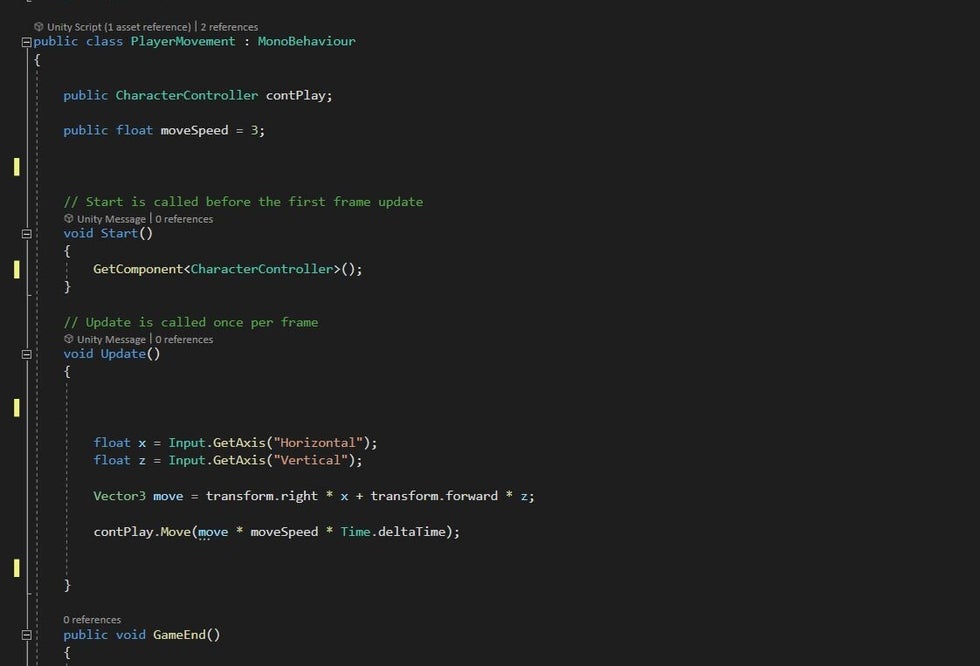
After creating basic character movement in the past, this script would allow the player to freely explore the grey box. However, they were limited on their movement by not having jumping or sprinting. So the next task was to try and update this script to allow the player to jump and move up basic slopes such as stairs.
Unity Project - Advancing player movement:
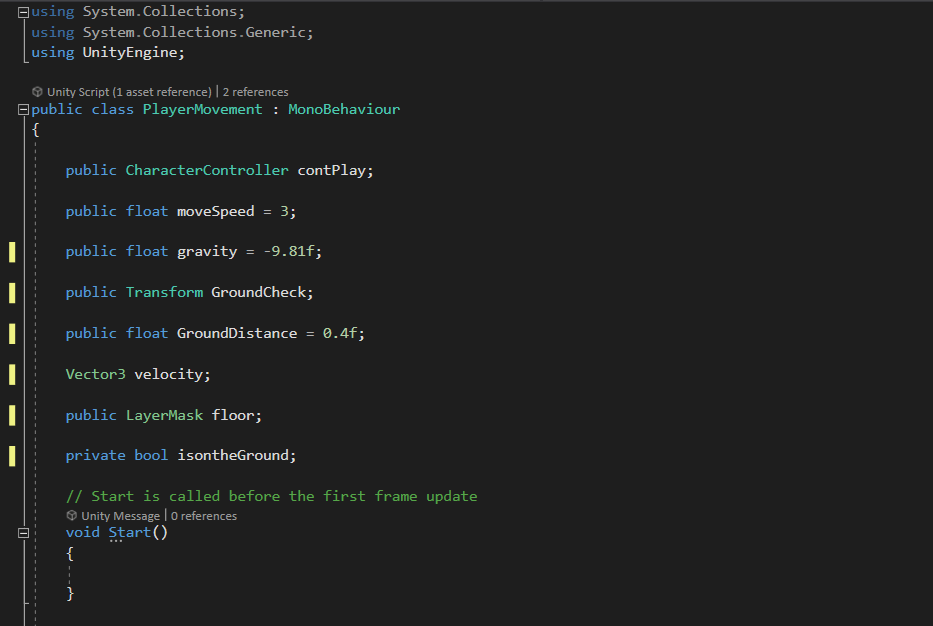
To try and accomplish this new movement;
- More floats were added for how fast the player could jump up and down,
- The speed on which they would fall back to the ground,
- New Vector 3 to assign the velocity,
- New LayerMask so the player object could recognize the floor,
- And a Bool to check if the player was on the floor.
Next, the Update void was tweaked so that it could check if the player was back on the ground, they could move again. Additionally, setting the speed of jumping up and falling back down with the frames per second, so it would transition smoothly.
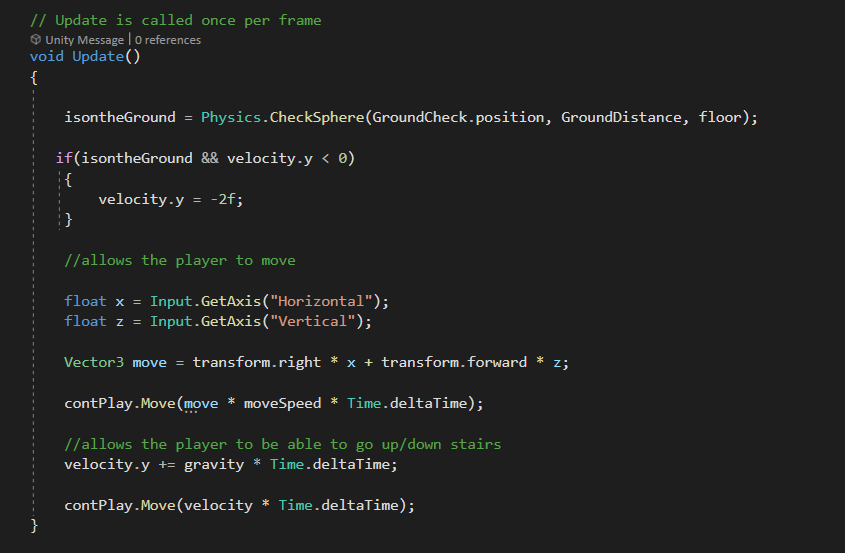
Unfortunately, after making these changes, this script would not work as intended as the jumping was not assigned correctly to the player. As the focus for now was on the general gameplay aspects, the jumping/falling would be more of a desirable feature as for this project it was unecessary.
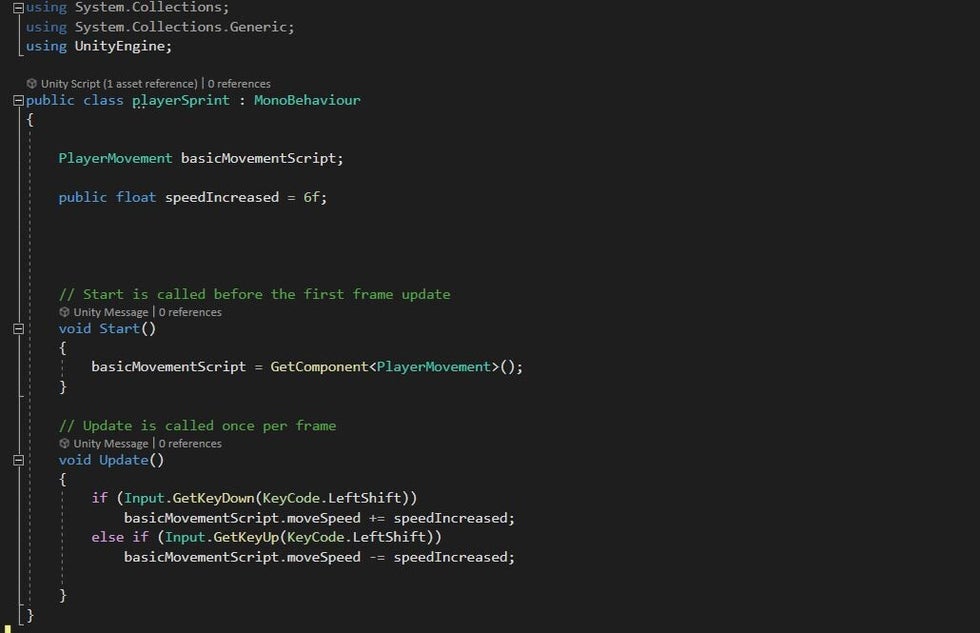
Unity Project - Adding sprint:
Although the project would not need jumping, the focus was shifted onto sprinting as the player would need to be able to run away from the enemy when being pursued later. For this;
- the previous script was assigned so it could be called in this new one,
- Added a float to update the movement,
- Created an if statement that checks if the bind assigned is pressed, the player could sprint.
Unity Project - Creating a roaming Ai:
The Ai would be the hardest part of implementation for the project, which is why this task was tackled first. Without a basic Ai that could roam freely and search for the player, there would not be any real danger nor reason for the player to feel intimidated.
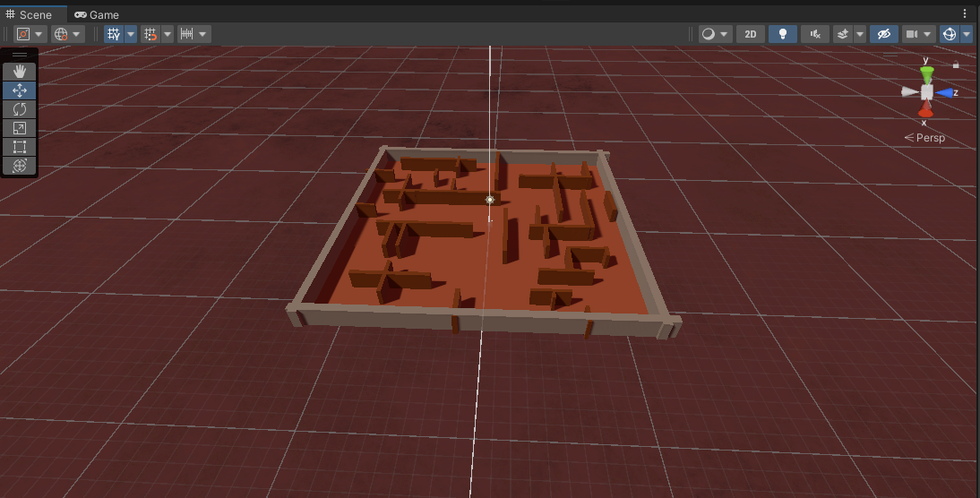
After doing several attempts, a basic roaming Ai was created that would go towards several points located around the Grey Box.
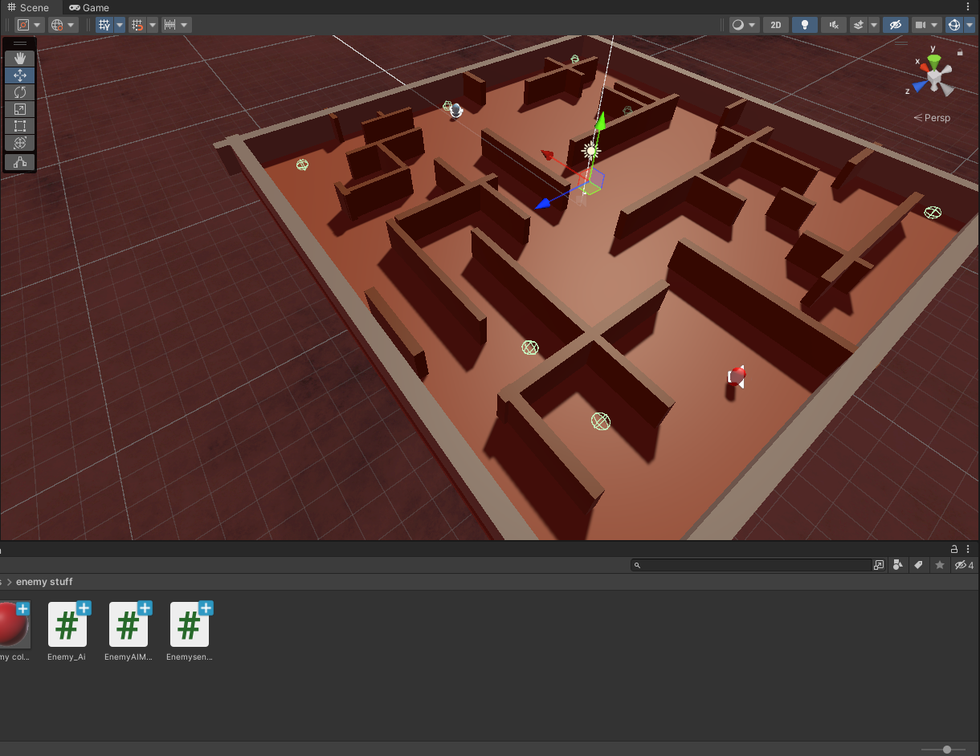
The green spheres located around the Grey Box are where the Ai would roam to within a set order. Meaning the Ai's roam is not naturally randomized. This was because; initially this was to test the Ai movement before starting to develop a more complicated system. Furthermore, for the project being worked on, the Ai for now just needed to be able to move around.
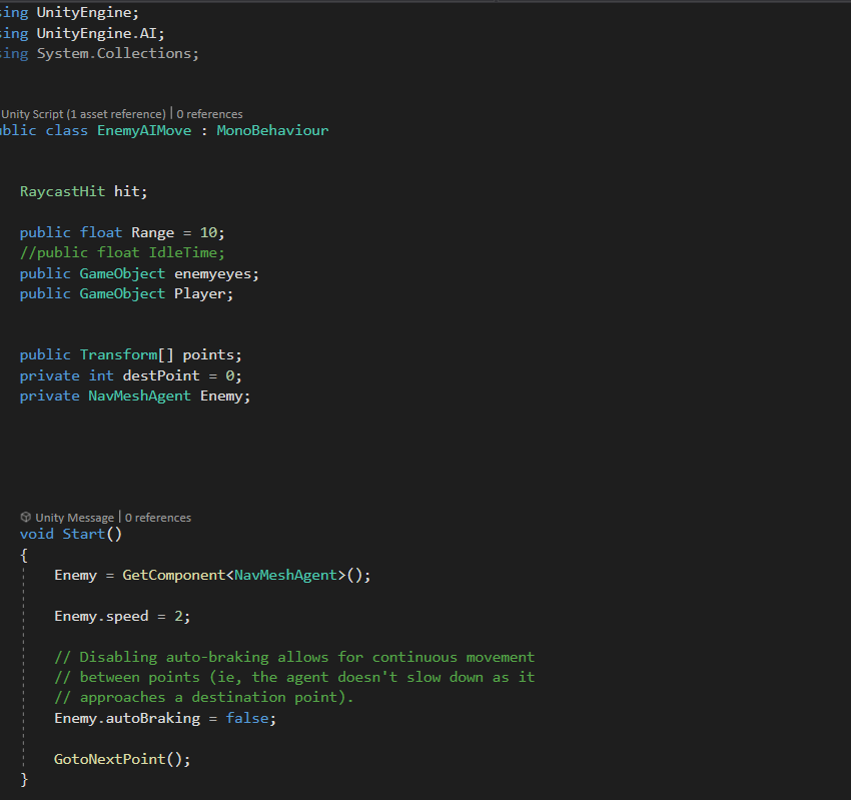
As the goal was to implement basic vision to the Ai, the basic lines of code required to do this was written. Having prior experience with basic Ai vision detection in the past would greatly help aid the development process. For the movement aspects;
- Creating a Transform list for the points (locations the Ai could go to),
- A private integer for destPoint (sets the value of the points the Ai has explored to a default of 0),
- Setting the NavMeshAgent to by classed as 'Enemy' (as this is the name given to the Ai).
For the Ai to target the player;
- Setting up a GameObject for the player (so the Ai can identify the player),
- Making a RaycastHit (receives information sent from a raycast and allows me to use a raycast to check for the player),
- Assigning the GameObject enemyeyes (so the raycast can be visually shown in the editor, and allow the Ai's sensor script to work alongside this script),
- And a float for the eyes range, which is default of 10.
The void start script;
- First, assigning the NavmeshAgent to a GetComponent<>() so the Ai's controller could be called and used when the game began and would not need to be called again. Letting the Ai be able to move once the rest of the script was assigned.
- Next, setting the speed of the enemy to a default of 2, giving the player time to freely move and not be caught by the enemy instantly at the beginning of the game.
- Creating an autoBraking and assigning it to false, so the Ai would continue to move from point to point.
- Finally, calling a custom void I made known as GotoNextPoint().
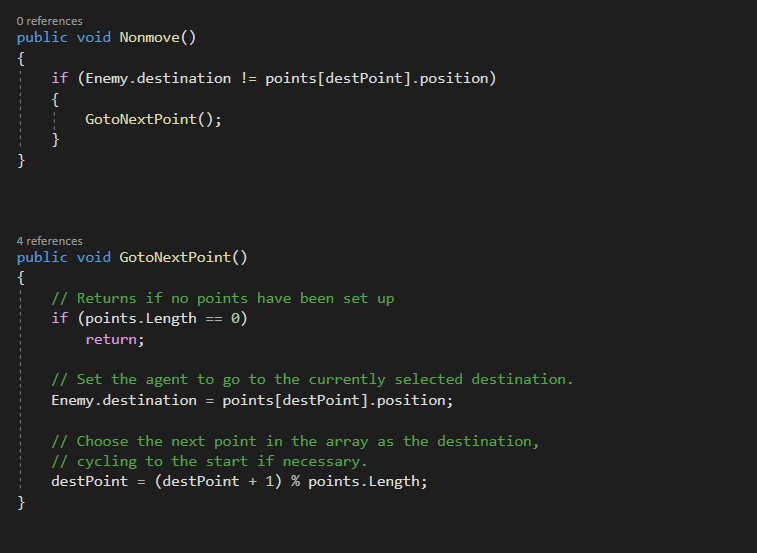
With the void start set up, creating the functions for the two custom voids; GotoNextPoint() and Nonmove() was next. The purpose of Nonmove;
- Was to check if the enemy had not reached a destination point it was supposed to, it would just move to the next one.
Whereas for GotoNextPoint;
- if it had reached the next destination in the list, it would head to the next one. Additionally, once all destinations had been visited, it could then start over again.
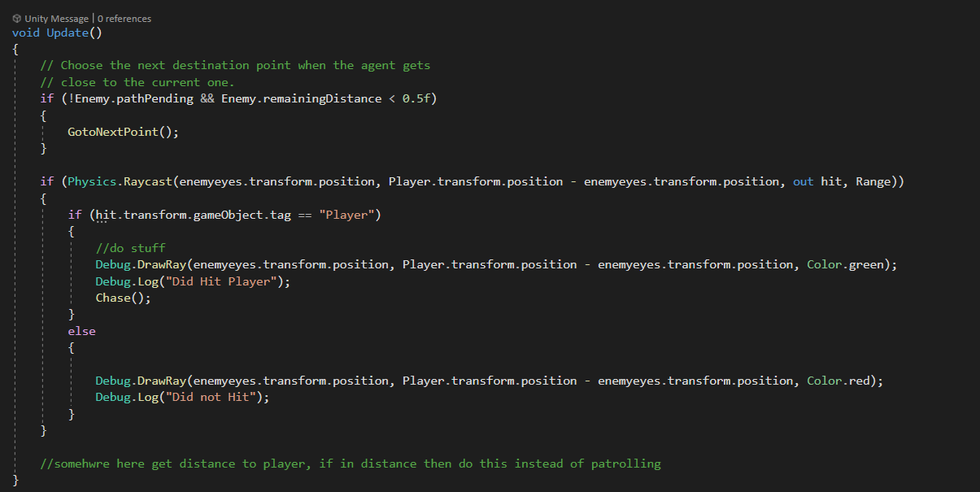
The purpose for the void update was so that it could re-call Events such as the GotoNextPoint() as well as constantly send the raycast for the eyes, so the Ai can continuously search for the player. If the enemy's eyes did hit the player, it could then begin the custom void Event, Chase(). If not, the Ai would then continue roaming as it searches for the player.
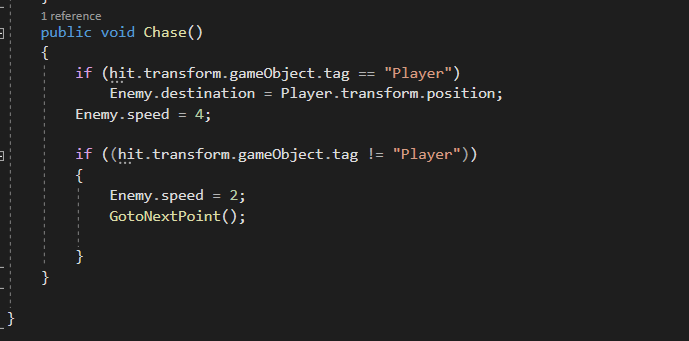
For the final section of the movement, the Chase() void Event needed to be implemented so the Ai was able to pursue the player once detected. To achieve this;
- If the raycast of the eyes had seen the player, the speed of the Ai would increase and the Ai would move itself from it's current position, towards the player.
- However, if the eyes did not hit the player, then it's speed would then return back to normal and the Ai would would return back to following the points within the list.
This is how it looks so far:
Unity project - Roaming Ai continued:
The next part for the Ai was to create a basic script for the enemy eyes object. This was so that when the eyes collided with the player object, it could not only run the Event to chase but this script specifically draws the raycast to find the player object.
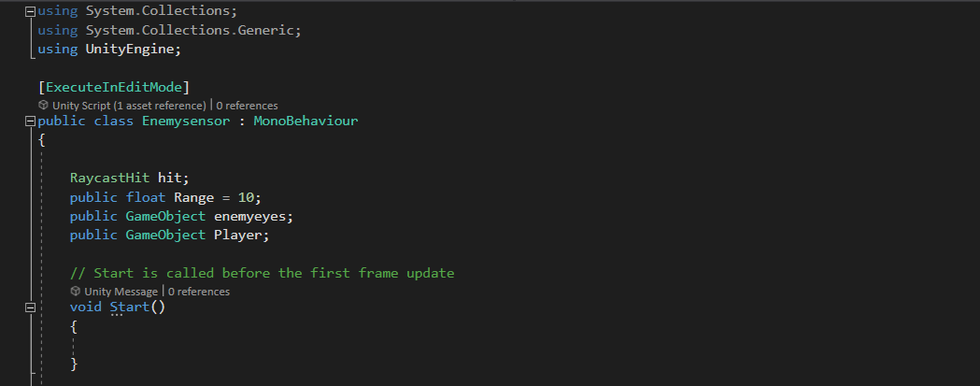
Before assigning any floats or variables, the next aim was to ensure that this script could work in the Edit Mode. This would allow the possibility to physically see if the raycast would be drawn as intended and allow easier debugging. This can be done by adding ExecuteInEditMode above the scripts public class. It was important to place here as this is where it should be so it would not interfere with the rest of the script, but still do what it is meant to.
Like with the previous script, some basic sections were added;
- A float to set the Range the raycast could reach/detect the player,
- Assign both the GameObject's for the eyes and the player,
- Assign the RaycastHit function.
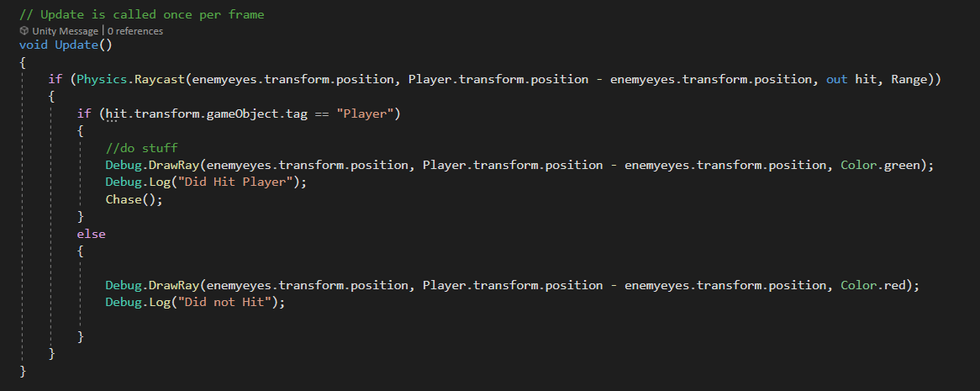
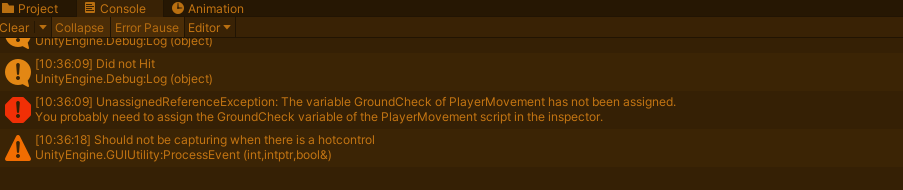
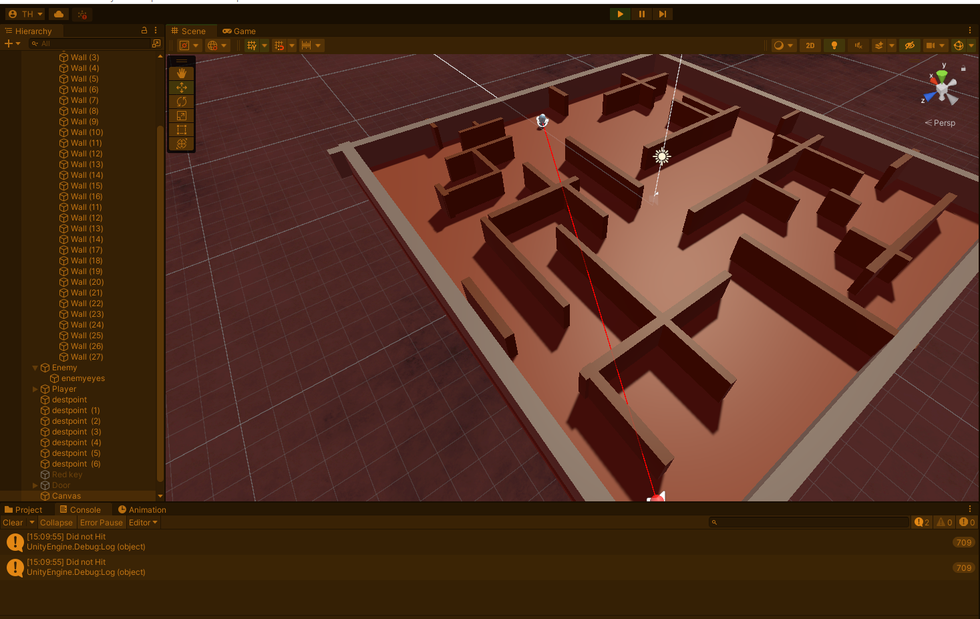
For the void update, the main function was to create this red line within the edit mode so that the range the Ai could detect the player could be visibly seen. To ensure that this worked, using the print debug logs to show if this line had hit the player object or not. The colour this line would be set was determined if it had seen the player, which can be seen below.
Red: It cannot see the player.
Green: the enemy has now seen the player:
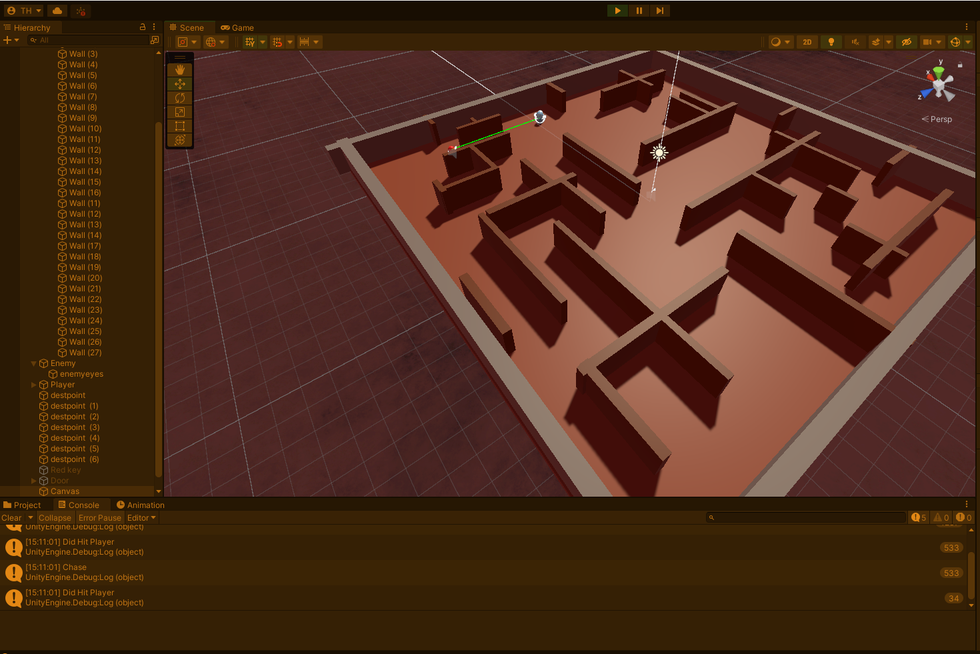
The final segment for this script, was to add another custom void for Chase(). However, this was so it could print messages in the debugger so I knew the Ai was actually reading the Chase Event properly and would begin pursuing the player once spotted. With the basics of the Ai created, work began on the next parts of the Ai, which was for when the player collided with it.
Unity project - Ai collision:
A simple collisions script was needed for when the both the player and enemies colliders made contact, so it would have a game over Event run. Having previous experience, the best way to achieve this:

Was to create a simple if statement that checks if the player had hit the enemy through a OnTriggerEnter Event. It's purpose is so it could check if the gameObject.tag for the enemy was detected within this Event, it would then load a scene to a game over screen. Additionally, the mouse cursor would become visible again.
Furthermore, to ensure this worked, a simple debug log was added to send the message "You Died" so it was easier to tell this Event was working. However, now a means to restart the game wad required.
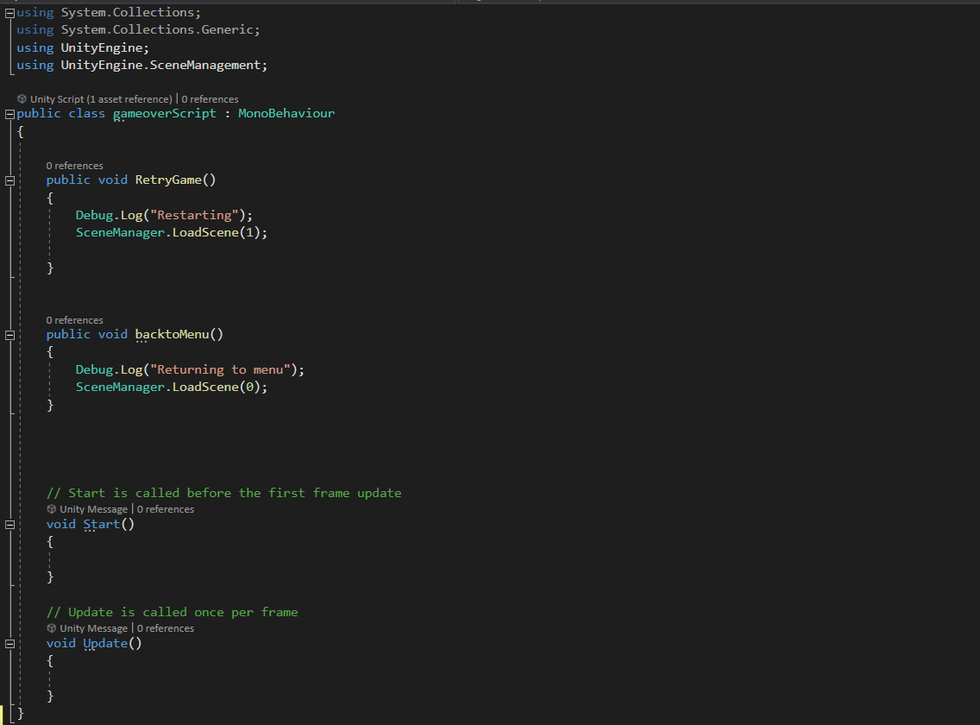
Like with the collisions Event, the Scene Manager was used so the player could select a retry button to return back into the game. Additionally, a custom Event was added to allow the player to transition to a simple menu as well. Because of this, making the basic menu script was the next task to be worked on.
Unity project - Basic main menu:
Having a game over mechanic already implemented, a simple method to transition from the menu back to the game was now required. On top of this, a quit the application Event. Having the menu and restart scripts now working, the focus was to shift onto the mechanics the game needed.
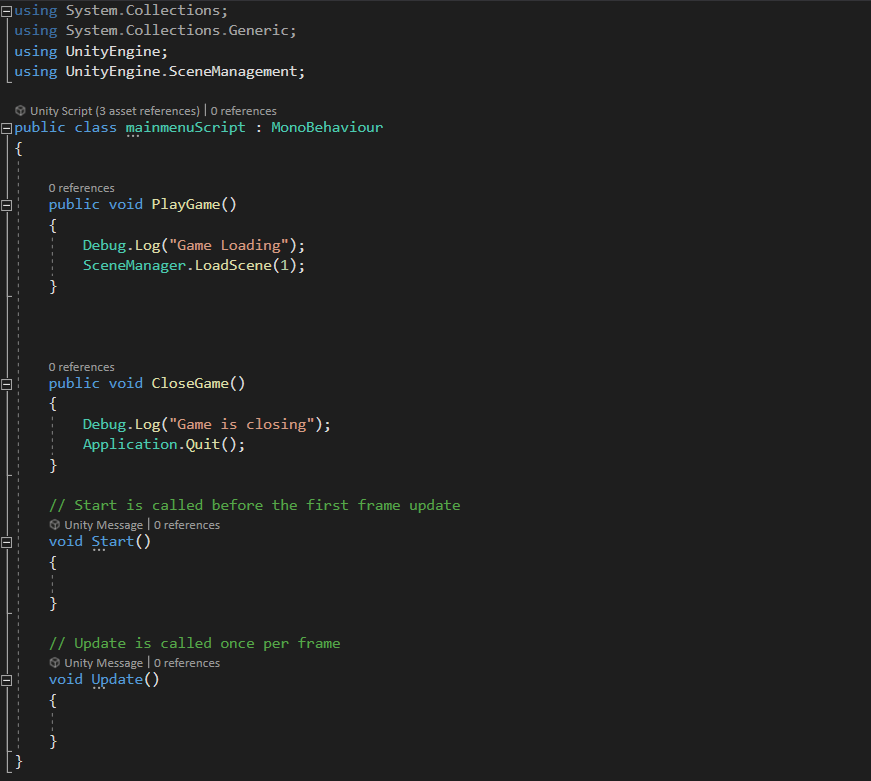
As before, using the Scene Manager to load from the menu to the game by adjusting the scenes in the project editor in a numerable order. Next, adding simple debug logs to show that this script was working in the editor and would transition from each scene.
Here is a short video showcasing this:
Unity project - Door & key mechanic:
The first mechanic aimed inside of this Unity project, was to create a basic door that was locked and the only way to open the door would be to collect the allocated key associated to that door. Such as having a coloured door have a corresponded coloured key.
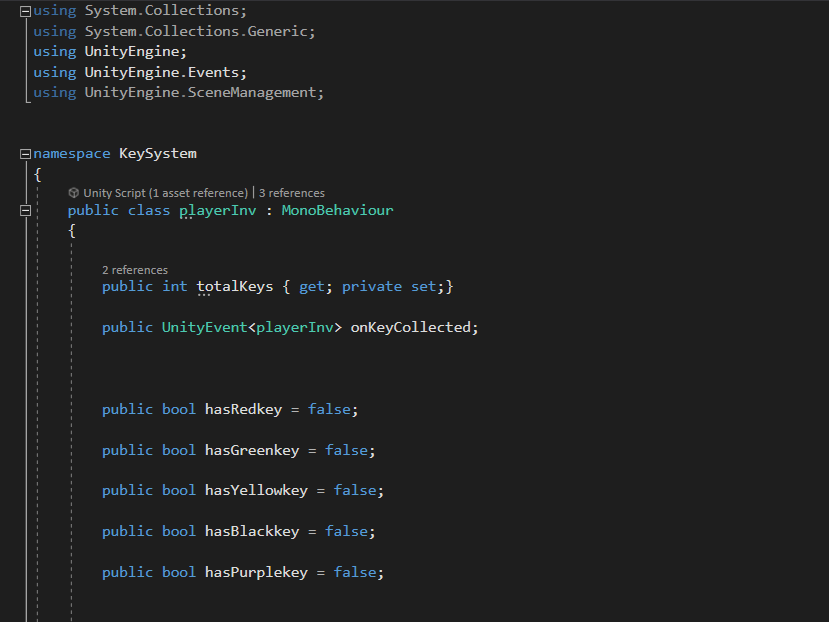
Firstly, a script to store and identify which key the player had on hand would be needed for this. Allocating all scripts associated to this mechanic to the namepsace, KeySystem would help development. A namespace meant that any Event that was tied to that corresponding name (in this example, KeySystem), could recognize one another. All of the the keys by default would be set to false.
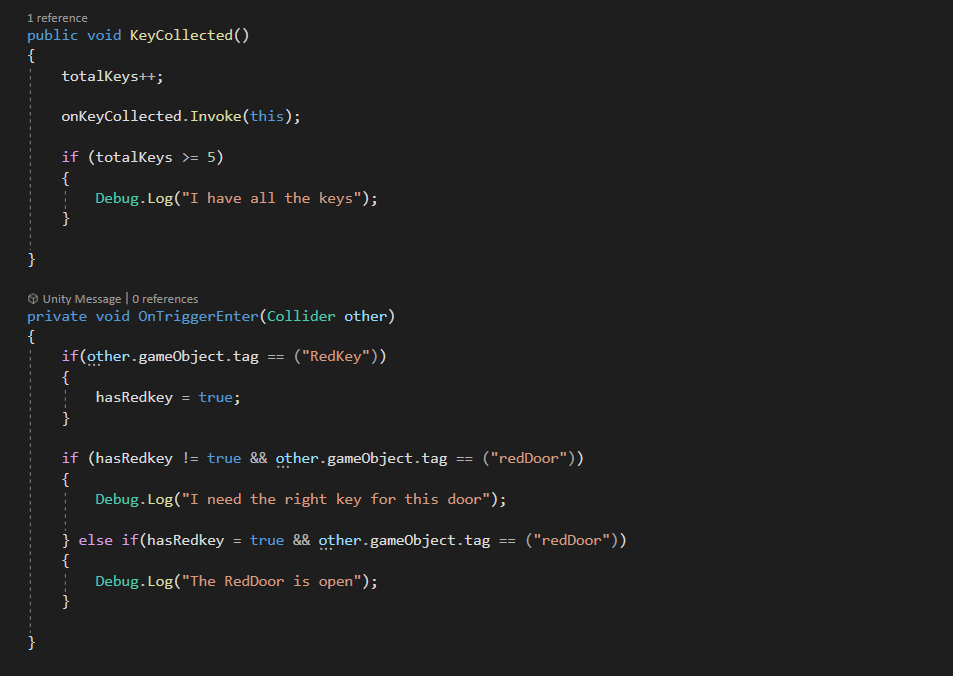
After creating a custom Event known as KeyCollected(), the value of the keys list would increase by which key was held. Then, adding an if statement to check if the associated key (in this example the Red Key) was collected, could then allow the player to open the door.
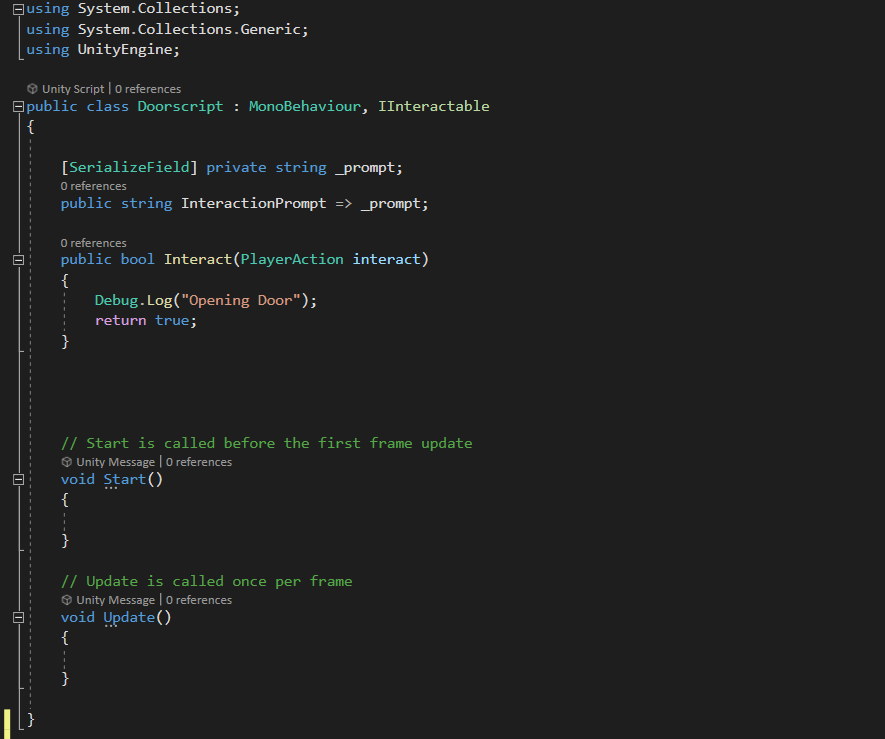
With this script made, there would also need to be a script for the Door so that it could be opened when the player interacted with it and the correct key was held.
Unity project - Key script:
If the player picked up a key, having it play a basic sound effect would help signal the player had acquired this item. Additionally, using the KeySystem namespace so it could recognize the previous script when this key was collected.
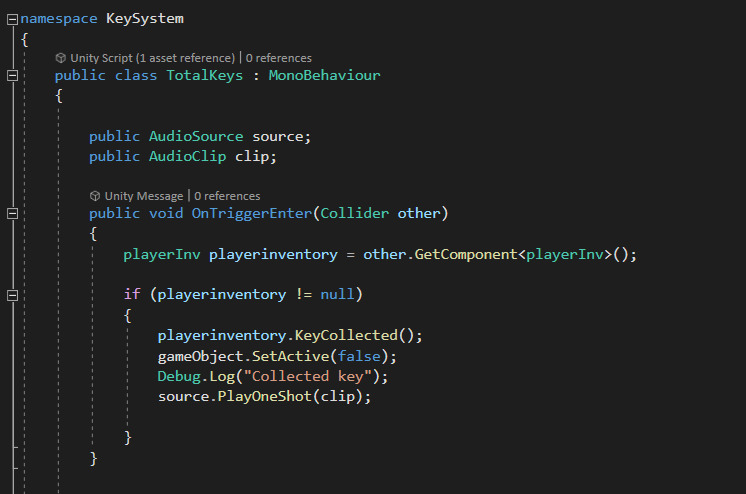
The main purpose for this script was so once the key had been collected, it would destroy the object off the map, add it to the player's inventory and play a sound to let the player know the key had been collected successfully. Having an object be destroyed upon pickup would also prevent too many items remaining on screen and potentially impact performance.
Unity project - Complications:
Once these scripts were made, basic testing was done to see how it looked in game. Unfortunately, the scripts had ran into a few errors and was not running the code as expected.
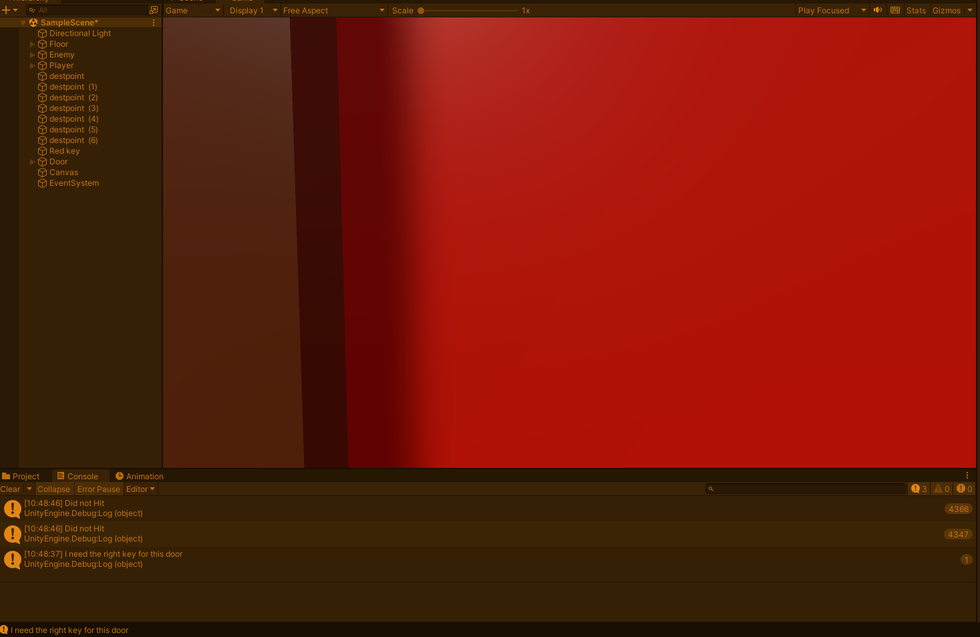

It would show that the key had been collected and that colliding with the door checked if you had the right key. However, after collecting the Red Key, the door would not run the rest of the script as it should.
Below you can see a video showing this.
Unity project - next steps:
Shortly after these complications had arose, a short break was taken to try and reflect on these new found issues and the best means to tackle them. However, by the time the latest project was checked to re-begin progression, the files of the project had been corrupted. Meaning, the current development process for this project was immediately dragged to a halt.
With no means to recover these files, a difficult decision was made to start over. However, as Unity's development was going slower than it was anticipated; to achieve the desired goals as both a Game and Sound Designer, trying a new engine was decided to see if more progression and skills could be learnt. This was to not just improve self knowledge of programming but how to incorporate the currently known skills and mindset to a new game engine software.
A minor inconvenience such as this would not deter the progress too harshly, as having many years of experience in doing Game Design has taught that these complications can arise at any given moment. Additionally, giving the opportunity to try a new engine could only further improve the skills of both a Game and Sound Designer. This methodology has been taught through doing Game Jams over the years and being used to a restricted time schedule and requirements.
Create Your Own Website With Webador